Event Checklist
Choosing The Perfect Linens
Choosing the right linens can be tricky business. Depending on the type of event and the effect you desire, there are several ways to put together the perfect table linen package. Below are a few guidelines for choosing the desired look for your event.
A Guide to Table Linens
3 ft/36″ Round Table
Informal: 54×54 Square
Formal: 90” Round Linen (floor length)
Layered: add a 54 x 54 Square Topper over the 90″ Linen
4ft/48″ Round Table
Informal: 90″ Round Linen (6in off Floor)
Formal: 108” Round Linen (floor length)
Layered: add a 74 x 74 Overlay or use with a 108″ Runner
5ft/60″ Round Table
Informal: 90″ Round Linen (lap length)
Semi-formal: 108” Round (6in off Floor) – recommended for Outdoor Formal Events in grass.
Formal: 120” Round Linen (floor length)
Layered: add a 90×90 Square Overlay or 108″ Runner
6ft/72″ Round Table
Informal: 108″ Linen (lap length)
Semi-formal: 120” Round (6in off Floor) – recommended for Outdoor Formal Events in grass.
Formal:132” Linen (floor length)
Layered: add a 90×90 Square Overlay or 108″ Runner
6’ Banquet Table
Informal: 60″x 120″ Banquet- 9in Drop on Two Sides, 24in drop on ends. – NOT RECOMMENDED
Formal: 90″ x 132″ Drape to floor on Four Sides
Skirting: Use Skirting for food and/or head tables. Tables against a wall can use 3 sided skirt.
8’ Banquet Table
Informal: 60″x120″ Banquet- 9in Drop on four Sides
Formal – 90″ x 156″ Drape on Four Sides
Skirting:Use Skirting for food and/or head tables. Tables against a wall can use 3 sided skirt.
30” Round Bistro Table
Informal: Spandex Cover
Formal: 108” Round (to floor- no tie back)
With Tie Back: 120” Round for loose tie back, 132″ Round for tight Tie back and puddle
Sash- Use Sash to tie round bottom of linen
30 x 30 Card Table
54 x 54 square (lap length)
Beverage Calculator
Figuring out how many drinks to buy for a party can be tricky. We want to make it easy for you.
Guidelines are based on average Drinkers during a 3 hour event.
Non-Alcoholic Drinks:
50 guests
- 3 gallons of iced tea
- 2 gallons of lemonade
- 2 soft drinks per person
100 guests
- 7 gallons of iced tea
- 6 gallons of lemonade
- 2 soft drinks per person
150 guests
- 10 gallons of iced tea
- 8 gallons of lemonade
- 2 soft drinks per person
200 guests
- 13 gallons of iced tea
- 11 gallons of lemonade
- 2 soft drinks per person
Coffee:
One pound of coffee will make 55 cups of brewed coffee. One coffee station will serve 60 guests.
Alcoholic Drinks:
If you are doing a mix of beer, wine, and liquor you will want to estimate the number of beer drinkers, wine drinkers, and liquor drinkers to determine the amounts per person below.
- 3 bottles of beer per person
- 1 bottle of wine per person
- 1 liter bottle per four persons
Using Cooking Equipment
Beverage Equipment
Always warm a hot beverage container up by filling with hot water and then draining the water before filling it with the hot beverage. Use cold water for brewing. The is timed from a cold water start.
Chafing Equipment
- Place one inch of hot water in water pan of chafer before serving.
- Use 1 utensil per serving dish.
- When replenishing food in the chafing dish, always take out the used food pan and replace with a full one. Do not add fresh food to existing dish.
- Rectangular chafing dishes are good for foods that are to be kept flat such as chicken breasts, fish fillets and lasagna.
- Round chafing dishes are used for sauces, casserole type entrees, and some vegetables.
- Stainless steel food pans can be placed in the oven to keep warm.
- Light fuel 15 minutes before serving.
- If serving a buffet, allow one buffet line per 50 guests.
Flatware
- Utensils should be placed for use from the outer edge of the place setting toward the plate.
- Be sure to order separate counts of salad and dessert forks.
- You will need a serving fork and/or spoon for each serving dish, bowl or tray.
Dance Floor Sizing Chart
Use the following formula to determine dance floor size: no more than 50% of the people dance at any one time and each person requires 4-6 square feet of dance space. We use 5ft to get the sq ft needed, and always round up!
Flooring: 4 x 4 sections only
| Total # of Guests | Estimate Dancing | Sq ft Needed | Recommended size of Dance Floor |
|---|---|---|---|
| 50 | 25 | 125 | 12×12 |
| 75 | 37 | 185 | 12×16 |
| 100 | 50 | 250 | 16×16 |
| 125 | 63 | 315 | 16×20 |
| 150 | 75 | 375 | 20×20 |
| 175 | 88 | 440 | 20×24 |
| 200 | 100 | 500 | 24×24 |
| 225 | 113 | 565 | 24×24 |
| 250 | 125 | 625 | 24×28 |
| 275 | 138 | 690 | 28×28 |
| 300 | 150 | 750 | 28×28 |
| 325 | 163 | 815 | 28×32 |
| 350 | 175 | 875 | 28×32 |
| 375 | 188 | 940 | 32×32 |
| 400 | 200 | 1,000 | 32×32 |
| 425 | 213 | 1,065 | 32×36 |
| 450 | 225 | 1,125 | 32×36 |
| 475 | 238 | 1,190 | 36×36 |
| 500 | 250 | 1,250 | 36×36 |
| 500+ | 320 | 1,600 | 40×40 (Max Size) |
Tying A Sash Like A Pro
When planning a wedding, shower, or other event, there are many decisions to be made in regards to the tables and chairs. Since these items generally take up the bulk of the room, it’s important that the selections made are going to give the desired effect.
If you have decided to use a chair sash, there are many chair sash alternatives to the traditional bow. While none of these options are very difficult, the way that you tie the sash is not always intuitive. Listed below are pictures of each of these chair sash alternatives as well as basic instructions to help clarify on the difficult ones.
Some points to keep in mind:
- Length and width of the chair sash
- Difficulty of the chair sash tie
- Number of people who will be able to help tie on the day of the event
- Amount of time it takes to tie each chair sash
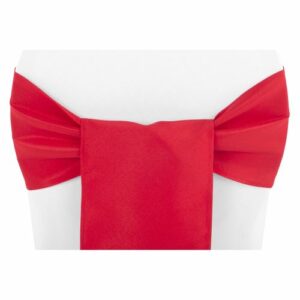
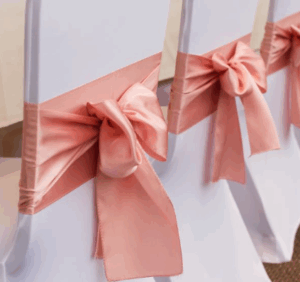
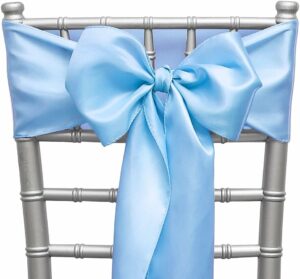 The Traditional Bow
The most commonly used and one of the easiest designs to create. Theres a reason why this one tops our list.
Difficulty: Easy Time: 1- 3 chairs a minute
How to: To make the bow, hold an end of the chair sash in each hand. Wrap the sash around the front of the chair back. Cross the ends of the sash and loop one side over the other. Tie a bow and tighten as needed.
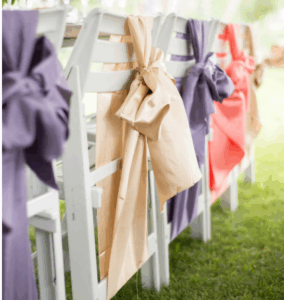
Variation: Side Bow
Same as the Traditional Bow, just turned to one side of the chair. Perfect for lining a cermony aisle.
The Knot
One of the fastest and easiest alternatives to the traditional bow. Perfect for tucking in florals and greenery.
Difficulty: Easy Time: 2- 4 chairs a minute
How to: To make the knot, hold an end of the chair sash in each hand. Wrap the sash around the front of the chair back. Cross the ends of the sash and loop one side over the other. Tie the ends in a tight knot and let the ends hang down the back of the chair. Tuck in your favorite floral or wrap with a rhinestone napkin ring to complete the look.
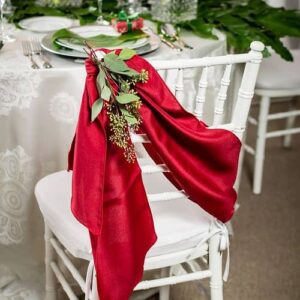 The Swoop
The Swoop is similar to side knot, but slightly more difficult. Although it is an easy chair sash, it does require more time make make the swoops on the chair the same and to create a draping effect that “looks” effortless.
Difficulty: Moderate Time: 1-2 per minute
How To: Start by finding your middle. Slide your hands up along both side until you find the right amount of swoop hang on the chair side. Tie a knot at this spot (not around the chair) –then drape the knotted sash over the chair. If it slides along the top, tie an additional knot around the top side to hold in place.
 The Side Wrap
A lovely way to get maximum coverage out of your sash. Looks beautiful with a bow or a knot. Cannot be used with rounded top chairs.
Difficulty: Moderate Time: 1- 3 chairs a minute
How to: Find the center of your sash and wrap it around the front of one corner of the chair and bring the sides down to the chair arm just above the seat tying a knot around the chair frame to hold it in place. Then tie a traditional bow or a knot.
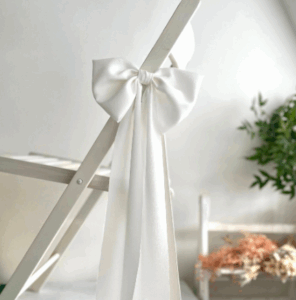
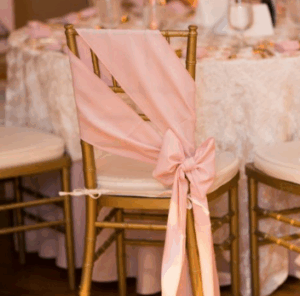
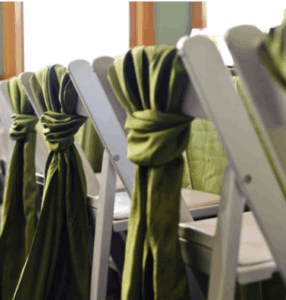
 The Vertical Bow
The vertical bow is a unexpected alternative to the traditional bow, but can only be completed on chairs that offer a bottom stability bar, like the resin chairs.
Difficulty: Easy Time: 2- 4 chairs a minute
How to: To create the vertical bow, take the sash around the bottom stability bar and above the seat top and meet evenly in the middle back or the chair. Cross the ends of the sash and loop one side over the other. Tie a bow and tighten as needed.
Variation: Vertical Knot
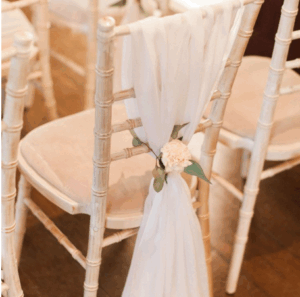 Perfect to use on chairs that don’t have a bottom support bar. Same steps as a vertical bow with-out the extra wrap around the bottom bar. Looks great with sheer fabric and florals tucked in the knot.
The Flip Knot
The flip knot is a sleek alternative to the traditional chair sash and is quick and easy to create.
Difficulty: Easy Time: 2- 4 chairs a minute
How To: For the flip over, follow the instructions to make a standard knot. Then take the longer hanging end and flip it under and over the top of the knot. Since this chair sash was a little bit longer, I flipped it over a second time to achieve the desired length. Straighten and smooth the flap as needed.
 Double Wrap Knot
The double wrap knot is one of my favorites because it gives the chair an extra splash of color while still preserving the lovely aspect of a knot (or bow) in the center.
Difficulty: Moderate Time: 2 – 3 minute
How To: To create the double wrapped knot, start at the middle of the chair (rather than the top). Take each end and wrap it around the chair crossing at the front (this is different than the other alternatives that crossed at the back). Take the ends and wrap it around the front (like a traditional bow) and cross over the ends in the back. Finish it off by tying either a knot or bow.
 The Obi
The obi is a refreshing and modern take on vertical knot. It is created the same way we wrap our neck with a scarf in the winter.
Difficulty: Easy to Moderate Time: 1- 3 minute
How To: Start by finding the middle. Create a bunny ear and put you hand through to keep open. Wrap the bunny ear over the top of the chair and pull through to the back. Tuck the two ends through the top of the bunny ear and pull as tight (or keep loose) as you like. Fluff out the loop when finished to give it a fuller look.
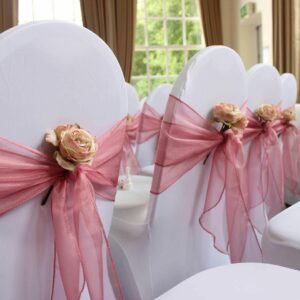
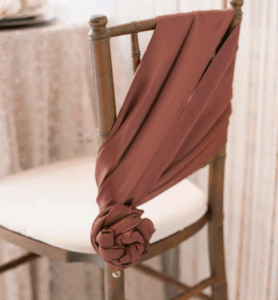 The Rosette
The rosette is another chair sash alternative that is beautiful, but more time consuming. If you are going to do the rosette on a great amount of chairs, make sure that you have plenty of time or people to assist.
Difficulty: Difficult Time: 1 minute +
How To: To make the rosette, wrap the ends of the chair sash around the chair as if making the traditional bow. Pull one end over the other to secure in place. Begin twisting one end of the sash over the other until you have a small amount of sash left at the ends (a few inches at most). Wind the twisted sash in a circle around the center back of the chair until a rose-shape is formed. Tuck the hanging ends to hold it in place.
Other Uses for Sashes
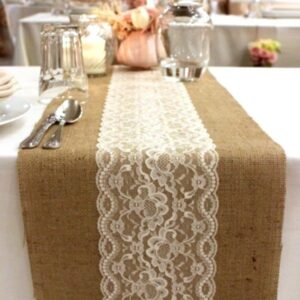 Table Runners
Sashes are a great economical choice in place of a standard table runner or layered on top of a runner for added texture, accent, or pop of color.
 Bistro Sash Ties
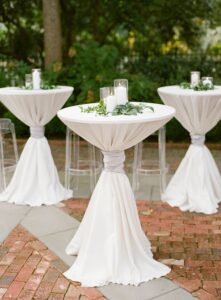
Wrap a sash around the middle of your bistro table linen and create a curved silhouette that lets your linen puddle gentle on the floor. Use any one of the chair ties above to create your desired look or do a tight wrap as seen to the right and tuck the ends in the create a wide band.
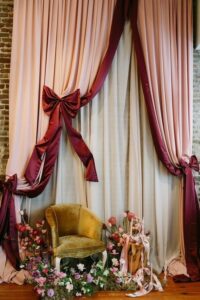
Backdrop Curtain Tie Backs
Tie sashes of one or multiple colors and textures along a backdrop pole to create a dramatic affect that that is both unique and stunning.
How To Use Table Runners
Table runners are an easy and effective way to dress up an ordinary table. Runners are available in a wide variety of sizes, materials and colors. While you can follow guidelines when using table runners, you may also decide to get creative and use them in different ways.
Traditional Guidelines for Table Runners
Typically, a table runner should hang over each side of the table where the ends fall. This is much more esthetically pleasing than a runner that stops where the table ends or is slightly shorter than the table. The amount of hang should be equal on both sides and can vary, just like the drop length of a tablecloth. A standard tablecloth drop can be from 6 to 12 inches. If you use a runner with a tablecloth, the drop length should be the same for both.
The width of a table runner should be roughly 1/3 the width of the table it is being used on when running lengthwise. For table runners placed across the width of a dining table, the runners should be narrower or about 1/4 the width of the table.
If you use a runner that is shorter in length than the table, make sure it is significantly shorter and use it underneath a centerpiece.
Ways to use Table Runners
Table runners can be used in many different ways and on different types of furniture.
Placed Lengthwise 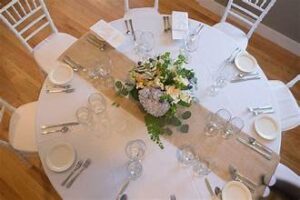 The most common way to use a table runner is to place the runner in the middle of the table, running lengthwise. This provides a perfect guide or path to keep multiple centerpieces or serving dishes in line.

Placed Across the Table Use a slightly narrower and shorter table runner placed across the table in front of each chair. These runners can serve as placemats and can be used in addition to a lengthwise runner or without one. Works best on rectangular tables.
 Layered Runners This works best when using two different widths of runners or a lacey top layer that allows the bottom color to shine through. Try using a solid color on the bottom and layer in a cordinating colored pattern on top or select two different textures to create visual depth to your table.
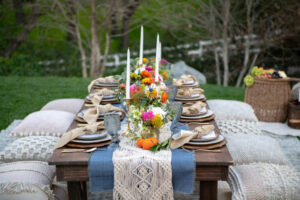
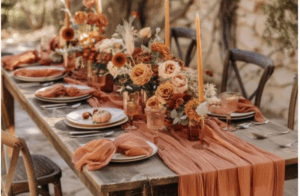 Draped Runners Perfect for sheer, cheescloth, or thin movable fabrics that can be scrunched around your centerpeices and woven effortlessly along your tablescape. Can be scrunched just in the middle of the table or go extra long so that the runner can drape down either side and puddle on the floor. Works best on rectangular tables.
Criss Cross 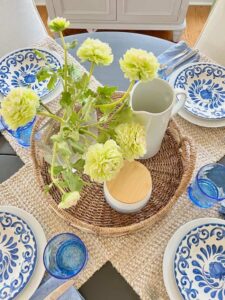 This can be done with two or more runners creating a beautifully layered look that doubles as placemats under your placesettings. Works well on both round and rectangular Tables.
Operating A Popcorn Machine
Bring on the POP for your next event – Rent a Popcorn Machine!
Nothing pleases a crowd quite like fresh, hot popcorn! Popcorn Machines are easy to operate, they smell great, and it’s fun to eat! Rent a popcorn machine for your next event.
Safety First! Locate switches and note safety tips.
- Light and warmer switch – turns on heat lamp
- Kettle motor switch – turns on motor that drives kettle agitator shaft
- Kettle heat switch – turns on heat element inside kettle
- Do not cover air vent holes! Motor air intake and exhaust holes at top of machine must be clear of any obstructions
- Avoid serious burns! Do not touch kettle while it is hot
How to Pop Corn. Follow these directions and let the fun begin.
- Turn on kettle switch, kettle motor and exhaust switch
- “Test pop” a kettle of corn – place oil measure in kettle with three corn kernels; when kernels pop, place remainder of oil, measured corn and flavoring in kettle; close lid
- When corn has popped, rotate the handle to empty popcorn from kettle; return kettle to upright position
- Repeat the cycle – subsequent batches are always more flavorful than the initial batch
- Turn off the kettle heat switch near the completion of the final batch. Eliminate smoke and odor by turning off when the popcorn breaks over the lid
- Turn off kettle heat, kettle motor and exhaust switches
- After kettle has cooled, wipe exterior of kettle with heavy cloth to prevent burn or stain of oil drippings
- Turn off all switches
Cleaning Tips
- Allow kettle to cool
- Unplug kettle and remove from machine
- Wipe clean: the kettle, kettle lids, crossbar and exterior. Do not immerse kettle in water!
- Remove popped corn
- Remove the “old maid” pan, empty unpopped kernels and wipe clean
- Clean the inside of the machine
Making Cotton Candy
Add some SUGAR to your next event – Rent a Cotton Candy Machine!
Nothing delights a crowd quite like fresh, spun cotton candy! Cotton Candy Machines are easy to operate, they smell great, and it’s fun to eat! With our tips and suggestions, you should have no problems making the perfect cotton candy! Rent a Cotton Candy Machine for your next event.
Safety First! Locate switches and note safety tips.
- Let your machine run for a couple of minutes or heat up before you add the sugar. This helps prevent one from making grainy cotton candy.
- Always….Always add the sugar when the motor is turning.
- Fill sugar to a capacity of 90 percent full.
- May use 100% pure cane or beet sugar. Regular granulated sugar is also recommended. Never use extra-fine granulated sugar or “free flowing sugar” which may clog up the machine.
- MOST IMPORTANT: Always use adult supervision when a child under the age of 18 is operating a cotton candy machine.
Getting The Perfect Floss
- In order to reduce and eliminate smoking of the machine, lower the “heat control fine-turning”.
- Raise the heat control setting if the floss is too thick; lower the heat control setting if the floss is too thin.
- Use the machine in an area where humidity is low, which enables you to produce fluffier cotton candy. Unfortunately, humidity may cause the candy to shrink.
- When storing the cotton candy into bags or containers, it is best to seal them tight or not allow any air into the container. Sometimes if air gets in the container it may discolor, shrink, or clump up the candy.
- To create brighter colors add one tablespoon of flossine per 5 pounds of sugar.
In order to keep your machine operating and running efficiently it is best that you clean it after each use. By following these tips, it will help reduce any malfunctions one may encounter in the future with any machine.
Cleaning Tips for Cotton Candy Machines
- Make sure all of the sugar is out of the floss head by running the machine until the sugar is completely gone.
- In order to remove carbon from the ribbons, be sure to empty the machine and turn the heat to the highest setting for at least one minute.
- Always unplug the main electrical supply cord after using the machine.
- Use a clean, damp cloth to wipe off the floss head with; NEVER allow water directly into the floss head.
- Make sure all parts are dry before operating the machine the next time that you use it or before you return it back to the rental store.